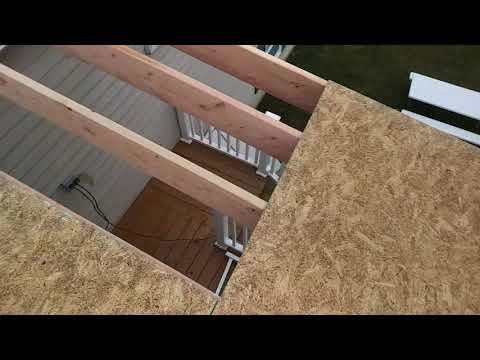
Okay, in this video, we're going to discuss briefly how to install OSB (oriented strand board) over a shed-style canopy roof deck. Currently, we have 2x10 rafters spaced out on 16-inch centers. This video specifically focuses on sheathing. Before proceeding, it's important to note the field miters, which connect to the existing roof. These will be fastened using mechanical brackets to the decking and frame, ensuring there are no gaps or vulnerabilities to wind gusts. On the other side of the rafter, there are hurricane clips to hold it down, but we won't delve into that topic. Moving on, we have 4x8 sheets of OSB. To install them, we prefer staggering them on a 4-foot seam pattern. In this case, we start with a 4-foot cut, followed by an 8-foot cut. Continuing this pattern, we alternate between 4-foot and 8-foot cuts. This staggered seam pattern provides the roof with integrity and rigidity. Once the sheathing is securely fastened, the side brackets that hold the joist and frame square can be removed, as the roof will maintain its structure independently. The pitch of this particular roof is around three degrees, which is quite shallow. Therefore, a roll roof will be used, but we won't discuss that further in this video. Now, two additional tips regarding OSB. Firstly, there is a dry side and a laminate side. The laminate side is smooth and should always face down, especially in attics or residential floors. The dry side prevents moisture buildup and rot in the wood. Inspectors may check for this, so it's important to have the dry side facing up. Secondly, if you observe closely, you'll notice that there are markings on the OSB. These markings indicate a specific side for installation. Overall, it's essential to follow good practices in installing OSB, with the dry side facing up and the...
Award-winning PDF software


Direction To Pay roofing Form: What You Should Know
Direction To Pay Form — Fill Out Fill with a name, address and phone print Fill Direction To Pay Form — Fill Out and Sign Fill with a name, address and phone print. Printable from mobile, tablet or PC ✓ Print out your direction to pay from PC, Mobile devices, iPad, iPad, iPad, iPad with filler and fill out form. Get and Sign Direction to Pay Sheet 2 Follow the step-by-step instructions below to design your direction to pay: Select the document you want to sign and click Upload. Choose My Signature. Decide on the following: Do you want to use the template, or you want to do all the drawing and sign yourself? Drawing Direction to Pay Sheet Do you want to use the template, or you want to do all the drawing and sign yourself? Fill the template in to get the right direction to pay for your home repairs ✓ Fill the template in to get the right direction to pay. Add your name and phone and fax number, and the amount of repairs to make sure the document is right for you. Step 0: Get Your Documents Ready You first decide which document to sign. Then you go to My Account and fill all the information as per the directions mentioned in the documents you have selected. To make your document more readable, make sure you print and complete it while you go to My Account. If you want to add a signature to the document, fill an additional sheet (Direction To Pay) at the same time, so you know there can be an additional signature on your document. Fill the signature sheet with the names of those who will sign it and other important information. Be sure to change the names of the contractor who will sign your document when you submit it for final payment. Step 1: Download The Direction To Pay Sheet Go to the Homeowner's Planning page to download the Direction To Pay Sheet 2. The page will open in a new tab and the link will be located within the Home front Dashboard page under the section, “Home front Dashboard”, “Get Files”, “Directions To Pay Sheet”. The document can also be downloaded from the following link: Home front Dashboard and upload the page to your account. Step 2: Design Your Direction to Pay Sheet Go to My Account and open the direction to pay sheet you just downloaded. Locate the file tab and click the small arrow that looks like two arrows. The file tab will open (shown below).
online solutions help you to manage your record administration along with raise the efficiency of the workflows. Stick to the fast guide to do Repair Authorization And Direction To Pay, steer clear of blunders along with furnish it in a timely manner:
How to complete any Repair Authorization And Direction To Pay online: - On the site with all the document, click on Begin immediately along with complete for the editor.
- Use your indications to submit established track record areas.
- Add your own info and speak to data.
- Make sure that you enter correct details and numbers throughout suitable areas.
- Very carefully confirm the content of the form as well as grammar along with punctuational.
- Navigate to Support area when you have questions or perhaps handle our assistance team.
- Place an electronic digital unique in your Repair Authorization And Direction To Pay by using Sign Device.
- After the form is fully gone, media Completed.
- Deliver the particular prepared document by way of electronic mail or facsimile, art print it out or perhaps reduce the gadget.
PDF editor permits you to help make changes to your Repair Authorization And Direction To Pay from the internet connected gadget, personalize it based on your requirements, indicator this in electronic format and also disperse differently.
Video instructions and help with filling out and completing Direction To Pay Form roofing